
The N1BUG 2 Meter EME Station 2003-2004

EME does not have to be complicated or expensive!
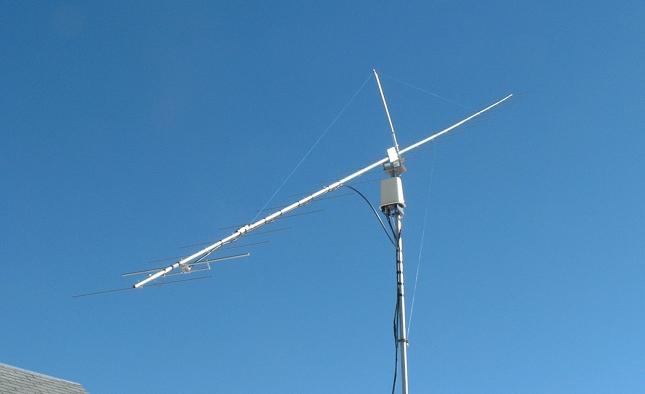
After being away from 2 meter EME for about a year, I modified an old CushCraft 4218XL antenna in the Spring of 2003 and put it on a simple hand-operated az/el mount. This was my 2 meter EME antenna from April, 2003 to February, 2004. When modified, the antenna is 20 elements on a 37.5 foot (11.5m) boom. Gain is 15.3 dBd. Modifying the antenna the way I did it takes only an afternoon (maybe less), a couple of extra CushCraft elements and some scrap aluminum tubing. I can supply a YO file and some construction notes if anyone seriously wants to duplicate the modification. [Note: there are higher performance yagis and plans available for this boom length! My objective was to use an antenna I already had and improve it using materials I already had in my parts pile]
The mount is equally simple. I put a 20 foot (6.1m) mast against the side of my house. On the ground beneath it I have a piece of wood with a hole cut in it for the bottom of the mast to go through. There is another piece of wood on the ground under the first one so the mast does not just push into the earth. There are some blocks of cement piled on the wood base to keep it from moving around during any high winds. A mast brake can be easily made by taking a short length of "L" shaped steel or aluminum stock (angle stock) and screwing it to the wood base beside the mast. A U bolt can then go around the mast and clamp it to the angle piece. In normal operation I do not find it necessary to use the brake unless it is quite windy.
The mast is supported by a very simple arrangement at the edge of the roof. two short pieces of wood are screwed to the edge of the roof with a gap between the ends just wide enough for the mast to fit between the blocks. The blocks are are the same thickness as the mast diameter. Once the mast is standing up and placed between these two blocks, another (longer) piece of wood can be placed in front of the mast and screwed into the two short blocks of wood on either side. This forms a very simple bearing for the mast at roof level.
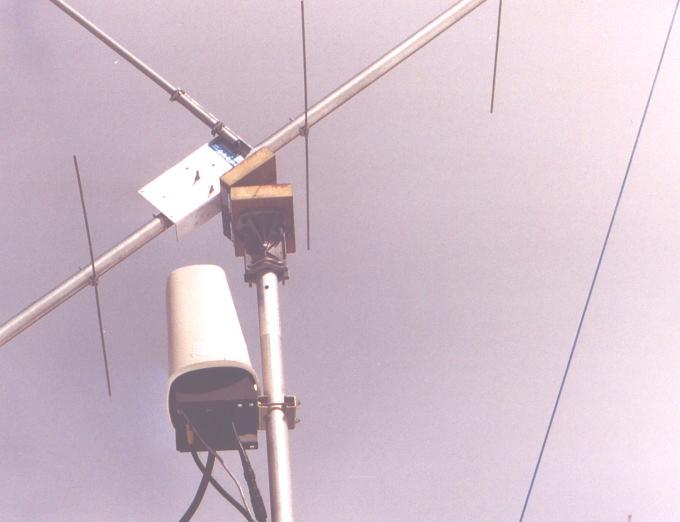
At the top of the mast a simple elevation hinge assembly is made by using two blocks of wood, a lower mast clamp from a HyGain/CDE or Alliance HD73 type rotator, and two door hinges. The two blocks of wood are placed one on top of the other and hinged along one edge. The rotator mast clamp is then screwed to one of the pieces of wood, and the yagi boom is attached to the other piece. The rotator mast clamp slides over the top of the antenna mast and should be tightened to it. I used a piece of aluminum angle to attach the antenna boom to the upper wood block, but any arrangement that secures it is fine.
|
The antenna. Preamp and relays are mounted under the small trash bin at the top of the mast. The simple home made hinge mechanism can be seen. You can also see a thin steel cable attached to the front part of the yagi and running down to the mast. By releasing the tension on this wire, the yagi can be elevated (the back of the yagi is more heavy than the front, so the front goes up unless it is held down to some point by the steel cable). |
|
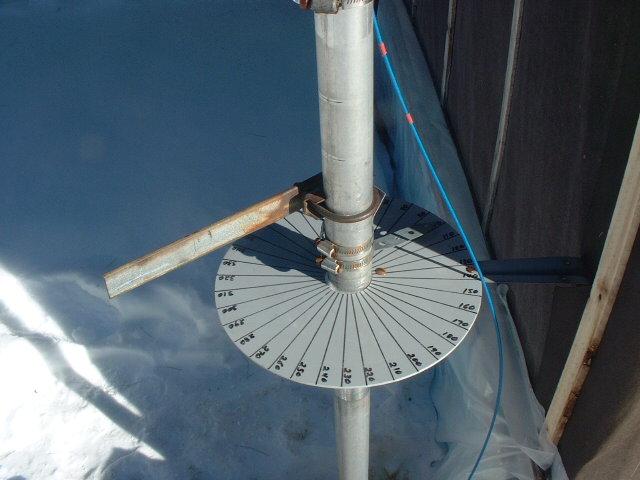
Here you can see the scale and pointer used to read the azimuth at the bottom of the mast, and the handle used to rotate the mast. At the top of the picture you can also see part of a clamp that holds the elevation cable at the proper point. The red spots on the elevation cable are pieces of heat shrinkable tubing. There is one mark for every 10 degrees of elevation. The azimuth scale is a piece of plastic that has radial lines drawn every 10 degrees. It is attached to the side of the house with an "L" shaped bracket. The azimuth pointer (which can be partly seen on the right in this photo -- some of the pointer is in the shadow) is just a thin piece of metal clamped to the mast. It points in the same direction as the front of the yagi. |
What can be worked with a simple setup like this?
Plenty!
The first weekend of operation with this antenna was an EME contest weekend
in April 2003. My azimuth was limited to a window from moonrise to 220 degrees, and then a short
window on the moon set. The roof is in the way of the reflector end of the antenna between these
times (many hours on each moon pass). I worked 30 stations that weekend, all CW, all random!
Among them was an easy QSO with PA0JMV, a 2-yagi station. I even heard my own echoes several
times during that weekend!! Yes, I am running a solid 1.5 kW, short feedline, and preamp at the
mast with very low loss cable from the preamp to the antenna... but it is still amazing to hear
one's own echoes using a single yagi with no ground gain! I would describe them as weak but of
a level sufficient for CW copy, and for as much as 15 minutes at a time.
Here is a small sample (wav file). The antenna was elevated 40 degrees
at the time of this recording... no ground gain here! This is in a 2.4 kHz bandwidth
and the echoes can still be heard... but for best results apply your favorite narrow bandwidth
audio filter to this. The signal is at about 520 Hz pitch.
I generally found it easy to work 4-yagi stations with this system. 2-yagi stations are possible, sometimes even on random. I have no doubt I could have worked another single yagi station with some effort on the part of both operators! Due to the relatively broad pattern of a single yagi, I found I only had to set the azimuth and elevation about every 30 minutes in most cases. It was useful to adjust more often for working the smaller stations, and for hearing my own echoes. Throughout almost one year that this antenna was up, there were many times when I could copy my own echoes. The best of them was on the last night of operation, when I could quite consistently hear my echoes for one full hour! This was more than I expected from a single 15.3 dBd antenna, and I think it shows what can be done with a small and simple EME system.
You may read my QSL policy.
![]()